
BeadieFriends.com
Patterns & Projects for Beading & Crafts
Plastic Canvas
Plastic canvas has rapidly grown into a well-known and much-loved form of needlecrafting. It's a simple technique that introduces beginners to the joy of creating something with their hands and imagination. Once you pick up a needle and a piece of plastic canvas, it will soon become a constant companion. Create wall hangings, mug rugs, boxes, bookmarks, purses, bags, placemats, eyeglass cases, key tags, book covers, barrettes, and much more. The ideas are endless!
MATERIALS NEEDED:
- Loom Pattern
- 7 count plastic canvas
- Plastic canvas needle
- Yarn
- Scissors
BASIC STITCHES:
|
|
|
|
|
Continental Stitch |
Long Stitch |
Backstitch |
|
|
|
|
|
Overcast Stitch |
Slanted Gobelin |
Whipstitch |
|
|
||
|
Cross Stitch |
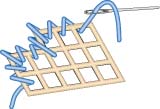
Continental Stitch - Basic stitch used to fill in colored areas of your graph. Work horizontal rows, bringing needle up at odd numbers and down at even numbers. Stitch from right to left on first row, then from left to right on second.
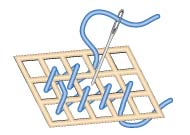
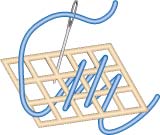
Long Stitch - Parallel straight stitches can be of varying lengths covering two or more bars.
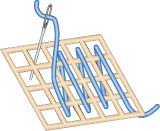
Slanted Gobelin Stitch - Variation of Continental Stitch, but it can be done over 2 or more threads of canvas at a time.
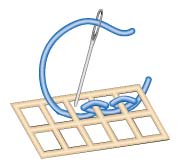
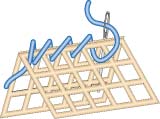
Backstitch - Stitches can be any length and go in any direction. Typically worked bringing needle up at odd numbers and down at even numbers.
Overcast Stitch - Used to finish edges. Make one stitch in each hole along straight edges and in inside corners, and three stitches in outside corners for complete coverage.
Whipstitch - Used to join two pieces of canvas. Make one stitch in each hole along straight edges and in inside corners, and two or three stitches in outside corners for complete coverage.
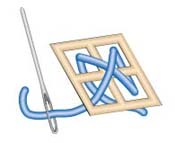
Cross Stitch - Two diagonal stitches over one intersection as shown.
INSTRUCTIONS:
- Thread needle with a comfortable length of yarn (see tips below).
- Continental Stitch, Cross Stitch, or Long Stitch with yarn color indicated on loom pattern until color area is covered.
- Continue stitching color areas on your graph until pattern is completed.
- To outline certain areas, Backstitch using one ply of yarn (pull yarn apart) or embroidery floss.
- To finish the edges of your design, Overcast Stitch in coordinating color.
- Cut out shape (if not using background fill). Young children need adult supervision when cutting. Be careful not to clip any weaving as you go!
- Optional: Finish off with fringe or bead embellishments if desired.
TIPS:
To keep a project neat on the back side, no knots are used. To start a row, a small tail of the yarn is left on the back side when you pull the yarn through to the front. The first few stitches are done over that tail on the back side to lock the yarn so it won't become undone. To end a row, turn over to the back, and run needle under 4 or 5 stitches, then cut the yarn.